I accidentally deleted important photos from my SD card while moving files from my camera, and now I can’t find them anywhere. These pictures are really important, and I need help figuring out the best way to recover deleted photos from an SD card before anything gets overwritten.
If you deleted photos from an SD card, the first thing I’d do is stop using the card. Right away. No more photos, no video, no retries in the camera. Every new write puts your old files at risk.
A lot of people think deleted means the data is gone on the spot. I used to think so too. On most SD cards, it usually works more like this: the card drops the file listing, but the photo data often stays there until something else lands on top of it. If nothing has overwritten those blocks yet, your odds are still decent.
One thing I would not do early on is run repair prompts. If Windows pops up with a message asking to fix or format the card, I’d leave it alone for now. CHKDSK and similar repair tools change the file system. Sometimes they help. Sometimes they make recovery worse. If your goal is getting photos back, I’d avoid giving the system permission to ‘clean things up’ before scanning.
For recovery software, I’d use Disk Drill. I’ve tested a bunch of these tools over time, and this one tends to do well with SD cards without making the process annoying.
Why I keep coming back to it for memory cards:
Where it tends to help
It’s useful for more than simple deletes. I’ve seen it work on cards which were:
- formatted by mistake
- showing up as RAW
- missing a partition
- looking empty even though space was still taken
- acting corrupted after use in a camera or phone
Basic recovery steps
The process is pretty plain:
- Put the SD card into your computer with a card reader.
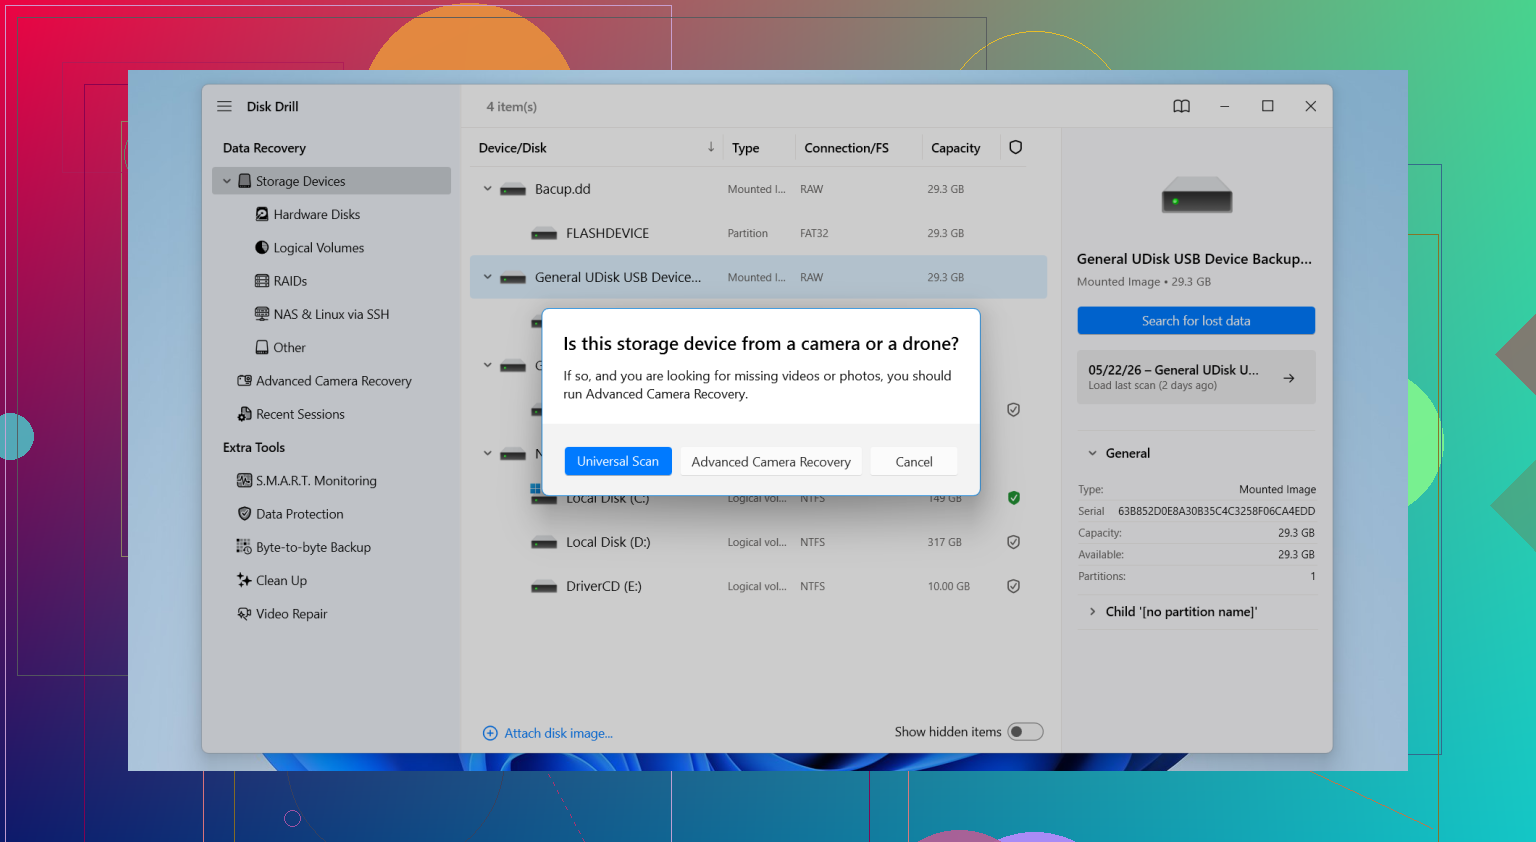
- Open Disk Drill.
- Find the SD card in the list of drives.
- Start the scan.
- Let the scan finish fully.
- Check the Pictures section, or filter by file type.
- Preview the files.
- Restore them somewhere else, not back onto the same SD card.
That last part matters. Save recovered files to your computer drive or an external disk. Don’t write them back to the card you’re trying to rescue.
File format support matters more than people think
If your SD card came from a camera, there’s a good chance you’re dealing with RAW formats or big video files, not only JPGs. This is where weaker recovery apps fall apart. Disk Drill supports formats like JPG, PNG, CR2, CR3, NEF, ARW, RAF, DNG, and more. If you shoot on a DSLR or mirrorless body, that matters.
I’ve seen cheap tools pull the JPEG previews and miss the original RAW files. Feels bad when you think the photos are back, then notice you only recovered the small versions.
Previewing files saves time
The preview feature helps a lot. Instead of restoring a mountain of junk and sorting it out later, you can check what looks intact before recovery. I prefer doing it this way because damaged files tend to show themselves early.
If the card looks unstable, make an image first
If the SD card keeps disconnecting, throws read errors, or looks badly corrupted, I’d make a byte-to-byte backup image before doing much else. That gives you a full copy of the card in its current state. Then you work from the image instead of stressing the original card over and over.
This step is worth it when the card feels sketchy. I’ve skipped it before. Bad idea.
Other places to check before you panic
I’d also look in a few boring places people forget about:
- Google Photos or iCloud sync
- older backups on external drives
- the camera’s internal storage, if it has any
- imported copies on your PC or Mac
- Time Machine or Windows File History
I’ve seen people recover ‘lost’ vacation photos from an old import folder they forgot existed.
When software isn’t enough
If the card has physical damage, recovery software usually won’t get you far. At that point, professional recovery services are the next step. They’re expensive, so I’d treat them as the paid-last-resort option unless the card is clearly failing at the hardware level.
If you only remember one part, make it this: stop using the SD card the moment you notice photos are missing. That single move does more for recovery odds than most people realize.
1 Like
First thing, do not put the SD card back in the camera. Do not copy anything to it. If your photos were deleted during a move, there is a decent chance the file entries got removed but the image data is still there.
I agree with @mikeappsreviewer on one part, stop using the card fast. Where I differ a bit is this. Before you run a full recovery scan, check the folder you moved the files into. A lot of ‘deleted’ photo cases are failed moves, hidden files, or photos sitting in a temp import folder on the computer.
My order would be:
- Check your PC recycle bin and photo import folder.
- Search by file type, JPG, PNG, CR2, NEF, ARW, DNG.
- If nothing shows up, connect the SD card with a reader.
- Scan it with Disk Drill.
- Recover files to your computer, not back to the card.
Why Disk Drill. It tends to find both deleted entries and signature-based photo data. That matters if the card index is damaged. On camera cards, file carving often pulls back images even after a quick format. Recovery rates drop hard if new data was written, so time matters a lot.
One more thing people skip. If the card reads slow, disconnects, or throws errors, make an image first and scan the image. Less risk, fewer read retries. Small step, big diffrence.
Also check this short guide if you want a quick visual walkthrough:
watch this quick SD card photo recovery video
If the card is bent, cracked, or not detected at all, software won’t do much. At taht point, a recovery lab is the next move.

I mostly agree with @mikeappsreviewer and @byteguru on the big rule: stop using the card. But I’d add one thing they didn’t really stress enough: if this happened during a move, the missing photos may actually be on the computer already, just not where you expected. Windows Explorer ‘move’ jobs fail in dumb ways all the time. Search the whole PC for *.jpg, *.jpeg, *.png, *.cr2, *.cr3, *.nef, *.arw, *.dng and sort by date.
Also, don’t keep plugging the card back into the camera to “check.” Cameras sometimes write little database files behind the scenes, which is not what you want right now.
If the files are truly gone from the card, yeah, Disk Drill is a solid choice for SD card photo recovery. I’d use it mainly because it handles both regular deleted-file recovery and deeper signature scans, which helps when the card index got messed up. One thing I do slightly disagree on: not every case needs a disk image first. If the card is reading normally and stable, I’d scan it right away. If it’s flaky, then image it first.
Two more checks people forget:
- cloud sync from your phone/computer
- your camera app import folder, especially on Mac Photos or Windows Photos
And if recovered files come back with weird names, don’t panic. That’s normal-ish. Content matters more than filenames.
For more discussion on SD card photo recovery, this thread is worth skimming: best ways to recover deleted JPG and CR3 photos from an SD card
If the card is physically damaged or not detected at all, software is probly done and a recovery lab is the only real option.
I’d do one thing a little differently from @byteguru, @sonhadordobosque, and @mikeappsreviewer. Before any recovery app, check whether the photos were moved into a weird hidden or temp location by the OS. On Windows, failed copy or interrupted move jobs sometimes leave files in AppData, the Pictures library cache, or under the last-used import folder instead of the obvious destination.
If they are truly gone, use Disk Drill, but with one rule: recover by folder structure first if available, not only by raw file signatures. Carved photos often lose original names, dates, and burst grouping, which is a pain if these were event or client shots.
Quick pros for Disk Drill:
- Good photo and RAW support
- Preview is useful
- Deep scan can find files after deletion or quick format
Cons:
- Deep scans can return lots of junk
- Filenames/folder structure are not always preserved
- Full recovery usually means paying
One small disagreement with the usual advice: imaging first is great for unstable cards, but if the card is healthy and fully readable, an immediate read-only scan is often fine and faster.
Also, if this was a microSD used in a phone or newer camera, recovery odds can be worse than people expect because some devices handle deletion and cleanup more aggressively.
If nothing previews correctly in Disk Drill, stop experimenting with random tools. That is when you either accept partial loss or go to a recovery lab.