My external Seagate hard drive suddenly won’t open in Windows and shows “The parameter is incorrect.” I’m worried about losing files and want to try safe data recovery or repair steps before formatting. What should I check first—cable/USB port, CHKDSK, SMART health, or recovery software?
Yeah, that 'The parameter is incorrect.' message is a horrible one to see, especially if it shows up on a backup drive. I ran into almost the same thing last year and immediately thought the drive was toast. In my case, it wasn’t. The drive was still physically working, but the file system was messed up badly enough that Windows couldn’t read it properly.
The main thing I’d do first is slow down. Don’t format it just because Windows suggests it, and don’t jump straight into CHKDSK unless you’re okay with it making changes to the drive. Repair tools can help later, but if the disk is failing, writing to it can make things worse.
Unplug the drive for now. Only reconnect it when you’re ready to check or recover data from it, and don’t copy anything new onto it.
Rule out the simple stuff first
Before treating it like a disaster, I’d check the boring things that sometimes actually fix it:
- Try a different USB cable
- Try another USB port
- Plug it into another computer
- See if it shows up in Disk Management
- Check SMART data with CrystalDiskInfo or Disk Drill
I’ve had one drive “fail” because of a bad cable, and another one act broken because a USB hub wasn’t giving it enough power. So it’s worth spending a few minutes on that before doing anything heavier.
Get the files off before trying to repair the drive
If the files matter, recovery comes before repair. That’s the part I’d focus on.
Option 1: Disk Drill
This is what I used because it didn’t need Windows Explorer to open the drive normally.
What I did was:
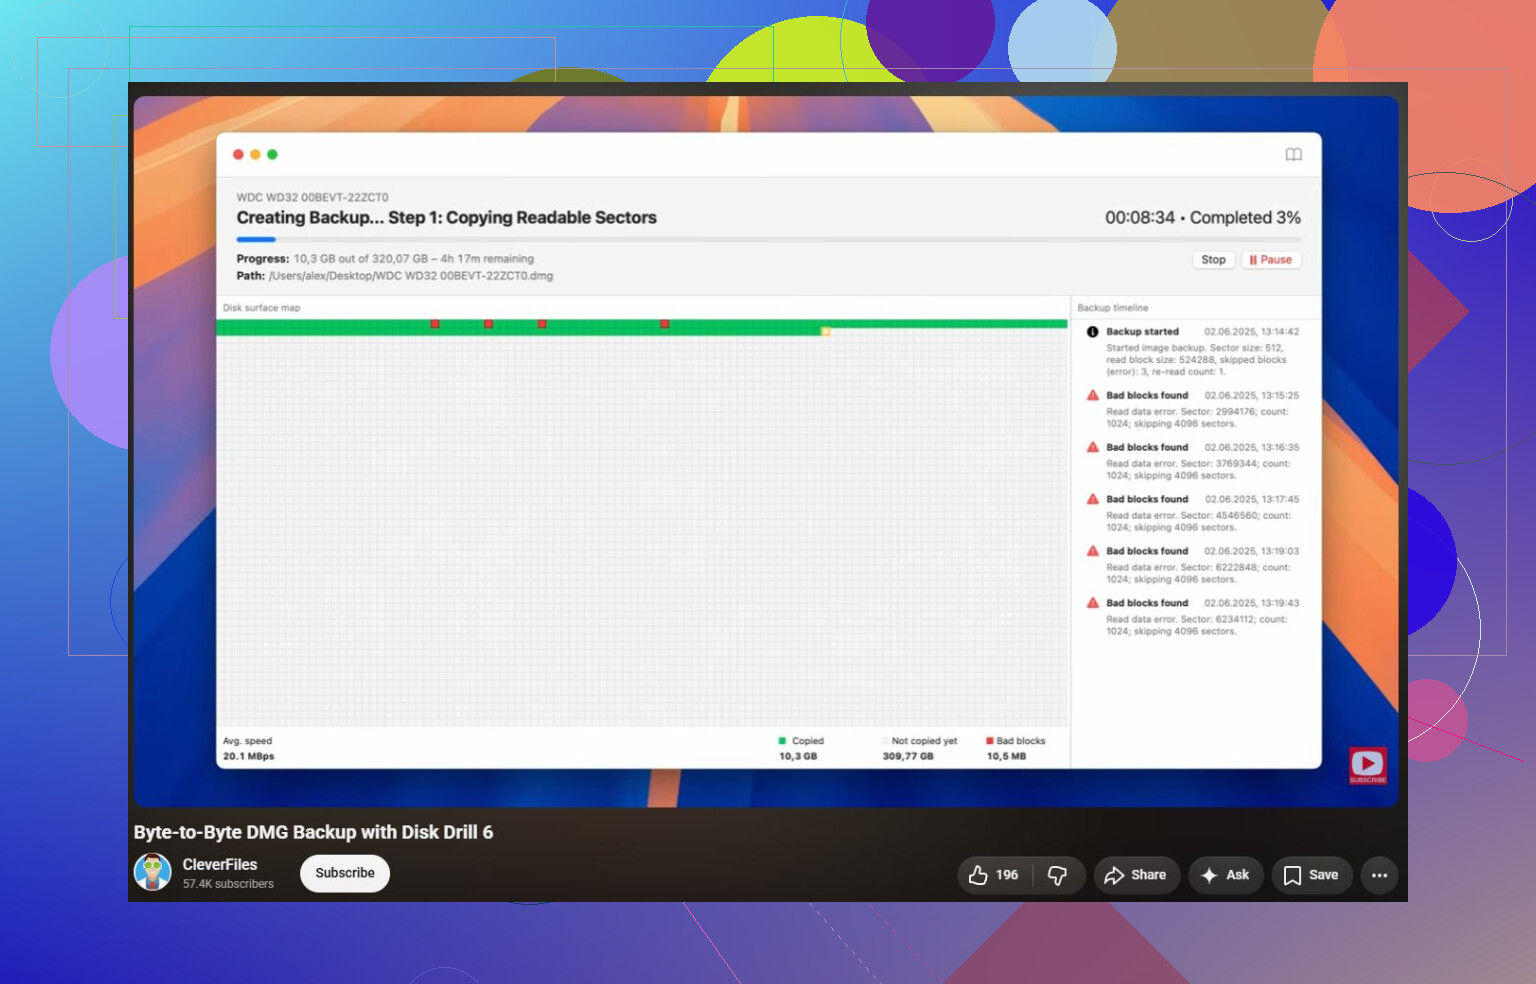
- Made a Byte-to-byte Backup of the drive first
- Scanned that backup instead of scanning the physical drive directly
- Ran a Universal Scan
- Previewed the files I cared about
- Recovered everything to a different drive
The preview step helped a lot. Once I could actually open photos before recovering them, I knew the data was still there and the situation was probably fixable.
Option 2: Check your backups
If you had File History, Windows Backup, OneDrive, Google Drive, or anything similar running, check there first. It sounds obvious, but restoring yesterday’s copy is way easier than spending hours scanning a damaged file system.
Option 3: Use a recovery lab
If the drive is clicking, constantly disconnecting, beeping, or vanishing from Disk Management, I wouldn’t keep poking at it with recovery software. Those are more like hardware failure signs. The more you power it on, the more you risk making the recovery harder.
After the data is safe, then try fixing it
Once the important stuff is recovered somewhere else, then I’d start testing repairs.
The order I’d usually try is:
- CHKDSK, if Windows still recognizes the file system
- TestDisk, if the partition shows as RAW or CHKDSK won’t run
- SFC and DISM, if the issue seems tied to Windows rather than the drive
- A quick format, but only after everything important is already recovered
There’s also one weird Windows-related fix that has helped some people: checking the decimal separator in regional settings. It’s not the first thing I’d suspect, but if this error is showing up in multiple places and not just with one external drive, it’s worth a look.
When I’d stop doing this myself
Software has limits. I’d stop and talk to a recovery lab if:
- SMART shows serious health problems
- The drive clicks, beeps, or keeps spinning down
- It disappears during scans
- Disk Drill can’t finish because the drive keeps disconnecting
Most recovery labs will inspect the drive, tell you what failed, and quote the job before doing the full recovery. Many reputable ones also offer no data, no fee service.
From what I’ve seen, logical recoveries are often around $300–600. If the drive needs clean-room work or replacement parts, it’s more often in the $700–2,000+ range.
Whether Windows shows the correct capacity in Disk Management matters a lot here. If it shows the right size and the partition is there, then @mikeappsreviewer’s “recover first, repair later” advice is the safe path. If it shows 0 bytes, the wrong size, or keeps dropping offline, stop testing cables and scans because that is more like hardware or enclosure trouble. For Seagate externals, I would not crack the case open right away either, since some USB enclosures can affect how the disk is read. If the drive is stable, make an image/clone to another disk first, then scan the image with Disk Drill or another recovery tool. Only after the files are copied somewhere else would I try CHKDSK or formatting. Formatting is not a fix for data you still need, it is the step after you have given up on the current file system.
Don’t “initialize” the disk if Windows offers that button. That is a different trap from formatting, and it can overwrite partition information you may still need.
I agree with the recover-first advice above, but I’d be a little stricter about how much poking around you do. Trying one known-good cable and one direct USB port is fine. Trying the drive 30 times, rebooting, unplugging mid-spin, switching hubs, and letting Windows rescan it over and over is not harmless if the drive is starting to fail.
The first thing I would check is Disk Management, but only to look, not to fix. You’re looking for a few clues:
- Does it show the correct physical size?
- Does the partition have the right size?
- Does it say NTFS/exFAT, RAW, Unallocated, or Not Initialized?
- Does the drive disappear and reappear while you’re watching?
- Does it ask you to initialize or format?
If it shows the right capacity and stays connected, that is usually the “software recovery may work” situation. In that case, do not repair the original disk first. Make an image or clone to another drive if you can, then scan the clone/image. Disk Drill can do this with a byte-to-byte backup, which is the part I’d use before caring about any of its other features. The important bit is not the brand of recovery app as much as the workflow: read from the bad/problem drive, save recovered files somewhere else, and avoid writing back to it.
If you cannot make a full image because it keeps hitting read errors, don’t immediately assume the scan failed because the program is bad. That can mean the drive has weak sectors or the USB bridge is misbehaving. At that point, decide how valuable the data is. If it’s replaceable stuff, you might keep going with software. If it’s family photos, tax records, client files, etc., stop before the drive gets worse.
A practical middle ground, if the drive still appears in recovery software, is to recover the most important folders first instead of trying to rescue the whole disk in one giant pass. People often start with a full deep scan, let it run for 18 hours, and then the disk drops offline before anything is saved. If the tool can show a file tree or found files early, grab the critical stuff to another disk first. Messy but safer.
CHKDSK is the step I would not use until after recovery. It can fix file system errors, but it does that by changing the file system. Sometimes that gets a drive opening again. Sometimes it turns recoverable damaged folders into “found” fragments or deletes broken directory entries. It is not a recovery tool. If you want to experiment with CHKDSK, do it on the clone, not the only copy.
Formatting should be last, and only after you have either recovered the files or decided you don’t need them. Quick format is enough to make the drive usable again if the problem was only file system corruption, but I would still test the drive afterward before trusting it. If it throws errors again, disconnects, reports bad health, or behaves oddly during a long copy, retire it from backup duty.
The short version: look in Disk Management, don’t initialize, don’t format, don’t run CHKDSK yet, and don’t keep power-cycling it for fun. If it is stable, image it and recover from the image. If it is unstable, noisy, vanishing, or showing the wrong size, software recovery becomes a gamble and a lab is the safer route.
Do not take the bare drive out of the Seagate enclosure unless you’re prepared for it to look even worse in another adapter. Some Seagate externals depend on the original USB bridge for sector size translation, and some models/enclosures can complicate access if you bypass them. If the USB port on the enclosure is physically broken, that is a different problem, but cracking it open as a first troubleshooting step can turn a readable disk into a confusing mess.
I agree with the “recover first, repair later” direction, but the enclosure issue is the caveat I’d keep in mind. If Disk Management shows the right size and the drive stays online, keep using the same enclosure for imaging. Make your clone or image through that setup, then scan the image. Disk Drill is fine for that kind of workflow because its byte-to-byte image feature keeps you from hammering the original disk more than necessary, but the key is the image, not the brand name.
A boring thing people forget: make sure the destination drive is big enough and formatted sensibly before you start. If your Seagate is 2 TB, have another empty 2 TB or larger drive ready for the image, plus extra space somewhere else for recovered files. Don’t recover files back onto the Seagate. Don’t recover them onto a nearly full laptop SSD. And if you’re dealing with huge videos or backup archives, don’t use an old FAT32-formatted USB stick as the save target.
If Windows only throws “The parameter is incorrect” when you open the drive in Explorer, but recovery software can see folders, grab the important folders first. If Windows throws errors during every read, the drive clicks, disappears, or the capacity is wrong, stop treating it like a Windows problem. That is where repeated scans can cost you data.
Formatting can make the drive usable again, but it does not rescue the current file structure. Same with CHKDSK: maybe useful later, risky now. Get a copy of the data or an image first, then experiment on the copy or on the original only after you no longer care what happens to it.